Surgical Procedure
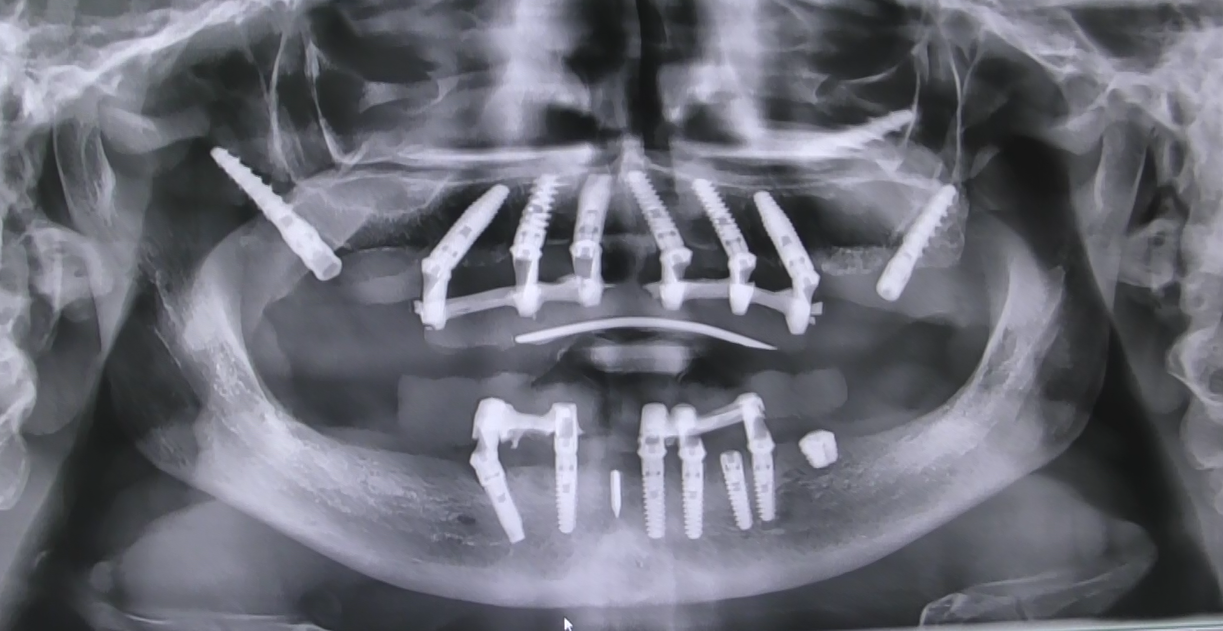
The Bilateral Sinus Solution™ (BSS) is a surgical procedure performed under local anaesthesia, lasting about 2 hours, with immediate loading of the temporary prosthesis. Here is the step-by-step description of the procedure.
Phase 1: Pre-operative evaluation
Before the BSS procedure, the patient undergoes a Cone Beam CT for the three-dimensional study of the bone anatomy, evaluation of the density of the tuber and sphenoid, digital planning of the implant placement with guided surgery and laboratory preparation of the temporary prosthesis that will be fitted with immediate loading.
Before the procedure, the patient undergoes:
- Cone Beam CT for the three-dimensional study of the bone anatomy
- Evaluation of the bone density of the tuber and the sphenoid
- Digital planning of the implant placement (guided surgery)
- Evaluation of the premaxillary area for the nasal and subnasal implants
- Preparation of the temporary prosthesis in the laboratory
Phase 2: Anaesthesia and incision
The BSS procedure is performed under local anaesthesia. Truncal anaesthesia of the upper maxillary nerve and local infiltration in the tuber and premaxilla area are performed. This is followed by a full-thickness mucosal incision on the alveolar ridge and skeletonisation of the maxillary tuberosity to expose the anatomical landmarks necessary for implant placement.
The procedure is performed under local anaesthesia:
- Truncal anaesthesia of the upper maxillary nerve
- Local infiltration in the tuber and premaxilla area
- Incision of the full-thickness mucosa on the alveolar ridge
- Skeletonisation of the maxillary tuberosity
- Identification of the anatomical landmarks
Phase 3: Placement of the pterygoid implants (18/28)
The most critical phase involves the preparation of the site with osteotomes, drilling with progressive drills at 45°-60° from the tuber towards the sphenoid plates, and placement of the 19-21 mm pterygoid implant. The implant crosses the tuber, the pyramidal process of the palatine bone and anchors for 1 cm in the sphenoid. The torque must exceed 50 Ncm for immediate loading.
This is the most critical and characteristic phase of the Bilateral Sinus Solution™ (BSS):
- Preparation of the site with osteotomes to compact the bone
- Drilling with progressive diameter drills, inclination 45°-60°
- The insertion axis follows the direction: from the tuber towards the cortical plates of the sphenoid
- Placement of the pterygoid implant: 19-21 mm long, 3.7-5.0 mm diameter
- The implant crosses the tuber, the pyramidal process of the palatine bone and anchors for about 1 cm in the sphenoid plates
- Torque control: it must exceed 50 Ncm to guarantee immediate loading
The bicortical anchorage is achieved when the implant engages both the cortex of the tuber and that of the sphenoid, creating a mechanical block of extreme stability.
Phase 4: Placement of the transverse nasal implants (15/25)
After the pterygoid implants, 2 transverse nasal implants are placed in the retrocanine fossae area near the canines (15/25). The insertion angulation bypasses the maxillary sinus laterally, using the extremely hard bone of the retrocanine fossae (NOT basal bone) to stabilise the prosthesis in the central area of the dental arch.
Next, the implants in the premaxillary area are placed:
- Placement of 2 transverse nasal implants
- Placed near the canines (15/25), with an angulation that bypasses the maxillary sinus
- They use the extremely hard bone of the retrocanine fossae (NOT basal implants)
Phase 5: Placement of the subnasal implants (4/6)
2-4 subnasal implants are placed in the frontal area (4/6) to complete the customised implant configuration of the arch. In case of thin bone, blade implants can be used as an alternative. These implants provide the anterior support needed to complete the load distribution over the whole implant perimeter.
- Placement of 2-4 subnasal implants in the frontal area
- Alternatively, blade implants can be used for thin bone
- They complete the implant configuration of the arch
Phase 6: Immediate loading
Within 24-48 hours of the procedure, digital or analogue impressions are taken, the laboratory prepares the temporary prosthesis with metal reinforcement, and the prosthesis is fitted with passive screw tightening on the implants. The patient leaves the clinic with fixed working teeth, without any period of edentulism.
Within 24-48 hours of the procedure:
- Impression taking digital or analogue
- The laboratory prepares the temporary prosthesis with metal reinforcement
- Fitting of the prosthesis: passive screw tightening on the implants
- The patient leaves with fixed working teeth
Phase 7: Follow-up and definitive prosthesis
After 6 months, the definitive prosthesis (Circolare d'Autore®) is fitted: 14 zirconia-ceramic teeth without fake gum, all molars, custom-made. A follow-up programme includes periodic checks of the occlusion, implant stability and hygiene. The definitive result: a complete, stable and aesthetic rehabilitation.
After about 6 months:
- Fitting of the definitive prosthesis (Circolare d'Autore®): 14 zirconia-ceramic teeth without fake gum, all molars, custom-made
- Follow-up programme: periodic checks of the occlusion, implant stability and hygiene
- The definitive result: a complete, stable and aesthetic rehabilitation
The Circolare d'Autore® prosthesis
- 14 teeth per arch, including all posterior molars
- Zero fake gum: the teeth emerge from the natural gum
- Zirconia + layered ceramic, with registered trademark ®
- Custom-made: every prosthesis is a unique piece designed for the patient
Discover all the details on the dedicated page: Circolare d'Autore® — the definitive prosthesis without fake gum.